| RO Units: Parts and Their Functions | ||||||
| Randal Bogarth | March 10, 2003 | |||||
This series is a step by step walkthrough of a 5 stage RO unit. As I go, I'll show a pic of each part and explain what exactly it does. It's not a how to assemble thing but I show some parts disassembled for greater detail. This particular unit was constructed for a Simply Member and I hope they don't mind my using it for educational purposes. The First part is a Slimline (tm) filter housing. This particular RO unit will use three of them. They are used for holding the prefilter cartriges. This part is of a type commonly used in RO unit manufacture. They are commonly referred to as "cans". They are available in 2 sizes, 10" and 20". The size indicates size of prefilter cartridges not the actual size of the whole prefilter housing. Most RO units will use them in clear (shown) or opaque white. They are equipped with two threaded holes for input and output of feed water and are available with multiple hole sizes and threads for various applications, including whole house filtration. This particular one is threaded in 1/4" for use in RO units. 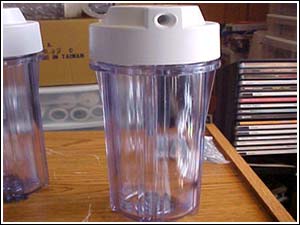 Photo 1: Here's a closeup of the top of the housing. It shows the direction of water travel through the housing. It is important to have the water flowing correctly. Improper flow will reduce efficiency of the prefilters and the unit as a whole.
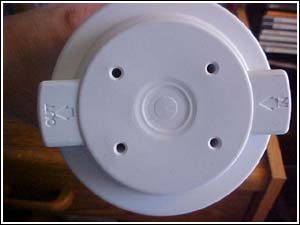 Photo 2: Here's a picture of the inside of the cap. Note the small hole (lighter circle) up to the right. That's the inlet. The hole in the center is the outlet. Correct flow enters on the outside of the prefilter and is forced through the prefilter by water pressure and then out through the center of the cap.
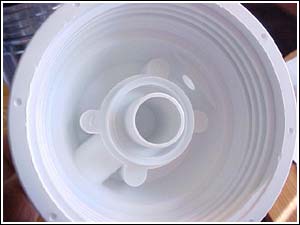 Photo 3: In the clear portion of the housing, there is also a small ring that holds the prefilter in place during assembly. The correct method for installing the prefilter is to place it in the bottom of the housing, setting the prefilter on the ring and seating it firmly.
more... |
 |
|||||
| About Us :: Message Board :: Chat | |||||
| Library :: Photo Gallery :: Links & Resources :: Breeders & Sponsors :: Merchandise | |||||
| Website designed by: EthanCote.com | © 2001-2004, SimplyDiscus.com. All Rights Reserved. | ||||